25 November 2011

How To Remove Bad Sectors From Hard Disk

0 Comments

How To Remove Bad Sectors From Hard Disk


1. Open My Computer to see the the drives under My Computer window.

2. Select the disk that you want to repair or remove bad sectors..

3. Right Click and Choose Properties from the File menu. You should see (at the end) the Properties window for the drive that you selected.

3. Choose the Tools tab.

4. Click the Check Now button under Error Checking Status.

5. In other Windows/OS, choose either "Thorough" or "Scan for and Attempt Recovery of Bad Sectors."

6. Click on Start.

How To Remove Administrator Password in Windows XP

0 Comments

How To Remove Administrator Password in Windows XP


  1. Boot using Windows XP Setup CD and follow the instructions.
  2. When it asks to repair your system or start setup then select “setup”.
  3. After pressing “F8″ (i agree for the agreement of course) setup will ask if you want to repair your current windows installation at this point press “R” to run the repair.
  4. Setup will start repairing your Windows and will start copying files, etc.
  5. After a few minutes setup will restart your system and when it restarts don’t press any key when it shows “Press any key to continue…” otherwise Setup will start from the beginning. Don’t press any key and setup will resume where it left.
  6. Now it’ll start doing other tasks and will show a small progressbar with a few details in left side.
  7. Look carefully at the details and when it shows “Installing devices” at this point press > keys in your keyboard.
  8. Wait for a sec or two then it’ll open a Command Prompt window. Now type nusrmgr.cpl and press .
  9. It’ll open the same “User Accounts” window which you see in Control Panel.
  10. Now you can remove or reset any account password without any problem.
  11. After setting the password close the window and leave the setup to complete.

How To Remove Write Protection From USB

0 Comments

How To Remove Write Protection From USB


It applies on all of these....
how to remove write protection from micro sd memory card
how to remove write protection from kingston flash drive
how to remove write protection from memory card of phone
how to remove write protection from sd memory card
how to remove write protection from usb flash drive
how to remove write protection from disk
how to remove write protection from sd card
how to remove write protection from usb in windows 7

Solution:
First click on Start then Run then regedit and OK.

Highlight "Computer" and right-click. Select "Export" and save the backup somewhere safe.
Just double-click it if you want to reset the changes you make.

Navigate to the following registry location:

HKEY_LOCAL_MACHINE\System\CurrentControlSet\Contro l\StorageDevicePolicies

Click on "StorageDevicePolicies" and on the right-hand side there should be a DWORD value labelled "WriteProtect". If there is not one, create it. Either way, make sure it has a value of 0.
Double-click it to change it.

Do the same "Method" with the following two locations
Note: (creating any non-existent keys/values along the way):

HKEY_LOCAL_MACHINE\SYSTEM\ControlSet001\Control
HKEY_LOCAL_MACHINE\SYSTEM\ControlSet002\Control

24 March 2011

How to Refresh or Repair Icons in Windows


How to Refresh or Repair Icons in Windows

We all have a bad habit of trying out all other freeware application available for our need. We usually install a number of applications and complain our system has gone slow. To make it fast, we uninstall all those apps which are not used frequently. Due to all this activity carried, sometimes the default icons for our files get corrupted and they start showing some icon which we don’t want to see.
If you are

  • a Windows Vista user and stuck with such problem, here is the solution for you. This is quite a simple solution and you don’t need to try any other software / registry hack or any complex control panel settings. Just delete a file and restart. Here we go -
  • First, you need to show all hidden files and folders.
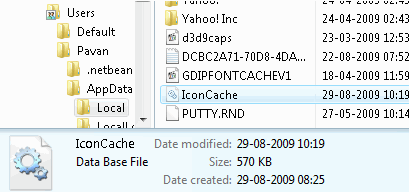
  • Navigate to C:\Users\%User Name%\AppData\Local\
  • Here you find a hidden file IconCache.db – Delete the file. Don’t worry about that as it won’t cause any problems with your Windows
  • installation. Delete it with Shift+Delete (permanent delete skipping Recycle Bin).
Rebuild Vista icon cache by IconCache.db
  • Now you will need to restart
    • the computer in order for changes to take effect.
    • After the restart, check for the above location to see if a new IconCache.db has been created, in most cases it will and the new file will have a smaller size than the previous one. You can also check the date created in properties in order to confirm that to be a new file.
Note: If it does not resolve the problem, you might need to perform all steps 2-3 times (restart is must).


About The Author

Hi! I am the man behind this blog, a professional Blogger, Web Designer, SEO Consultant, Computer Engineer and an addicted Web Developer.


eXTReMe Tracker

Support Us

If our of different IT related Tips & Uploads has providing help to you, and you like these then please spread our word using this badge below and attach this on your blog / website:-

| My Technology Updates © 2009-2012 All Rights Reserved | Contact us | Sitemap | Back To Top |